ChatGPT and large language models (LLMs) have taken over the world. Ok, just kidding – maybe not yet, but about a year after its introduction, it’s almost impossible to find a field where it didn’t have a significant impact. So, in Beyond Virtual, we wanted to allow you to connect your favorite virtual humans to OpenAI’s engine as well.
So, how do you connect your virtual human to ChatGPT? This step-by-step tutorial will take you through the process. Before we start, just make sure that you have an OpenAI account. Later in this conversation, we have two more features. First, how to diversify the virtual human’s pre-loaded content; Second, how to send the conversation to your email once it’s concluded.
Let’s go!
Setting up your virtual human
1. First, enter your virtual human brain through the dashboard. Then, click on the “Brain” below the virtual human’s picture.
2. Once you’re in, disconnect the dynamic component – which includes the default personality, knowledge, and quiz – from the first Navigation component.
(Note: this is the way to do it only if you’re going for the ChatGPT route straight out of the gate. However, you can leave the first navigation and the dynamic component connected, and add the ChatGPT connection later in the conversation)
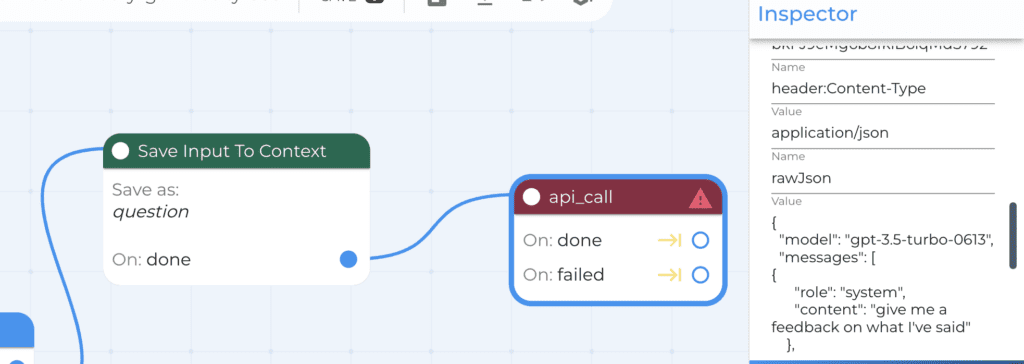
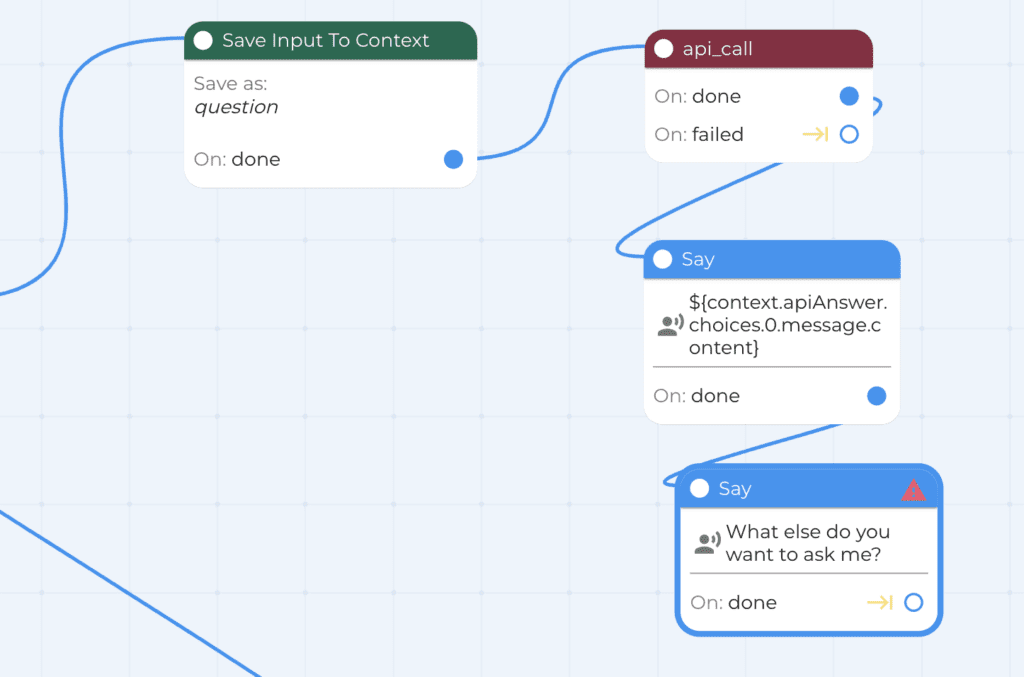
3. After the first navigation, click on the canvas. Now, search for a “Save Input To Context” component and add it to the canvas.
Then, in the “inspector” part of the brain (on the right), give the input a name – for example, “question”.
As a result, this component will save the user’s latest question.
4. Now, it’s time to click on the canvas – and search for the (red) API Call component. Although there is an explanation when you hover over the component, we’re explaining it here in greater detail.
5. At this point, connect the “save ” component to the API Call.
rawJson – here are the instructions for the actual prompt. The model is up to you and the account you have It contains the two roles in the chat: “system” is the bot, while “user” is you. It’s optional – if you won’t write anything, it will just answer you like you haven’t given OpenAI any instruction. Under the “role”: “system” (what the virtual human will say via OpenAI), after “content”, write, inside “”, the prompt you’re sending to ChatGPT. Under the “role”: “user”, in “content”, you need to type the name of the saved input from step 3. If you wrote a question, like we did – you don’t need to change anything in this part
contextKey: the value you’ll write there will contain the answer you’ll get from ChatGPT. You can name it any way you want (we wrote “apiAnswer”), just remember it for step 7.
For example, here’s how it works in our case, once you open the Advanced Features:
“content”: “Answer to me like I’m a 5 year old kid”
},
{
“role”: “user”,
“content”: “${context.question}”
}
]
}
contextKey
apiAnswer
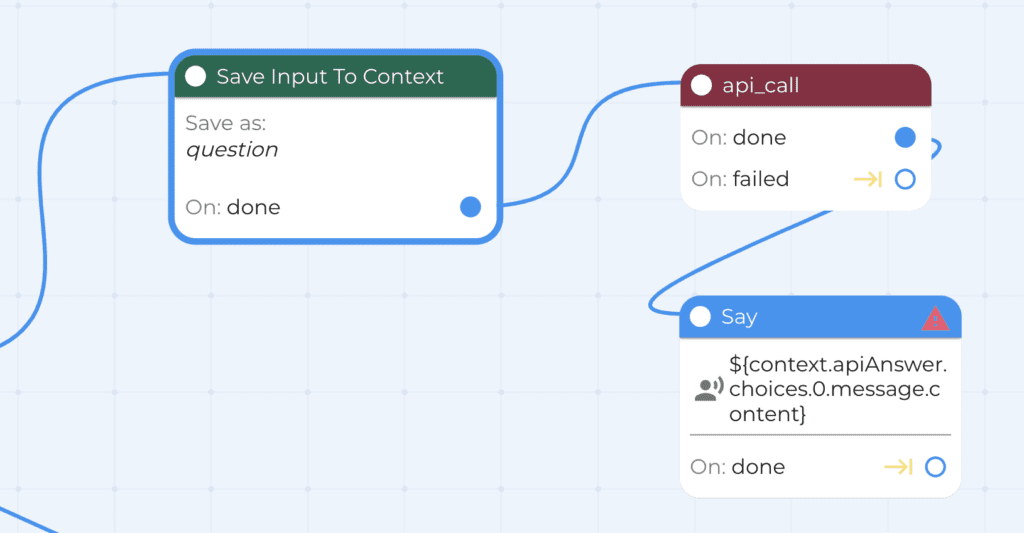
7. Now, add another “Say” from the canvas, connect the API call component to it, and write inside it
${context.apiAnswer.choices.0.message.content}
However, pay attention: If you wrote something else under “contextKey” in step 6, you’ll have to change the text in bold in the aforementioned Say component. Nevertheless, if you left it as we wrote, it should look like this:
8. Congrats, the first back-and-forth with ChatGPT is completed! Now, if you want to repeat it, just add another “Say”, for example, “What else do you want to ask me?”. Then, connect it to the previous “Say”.
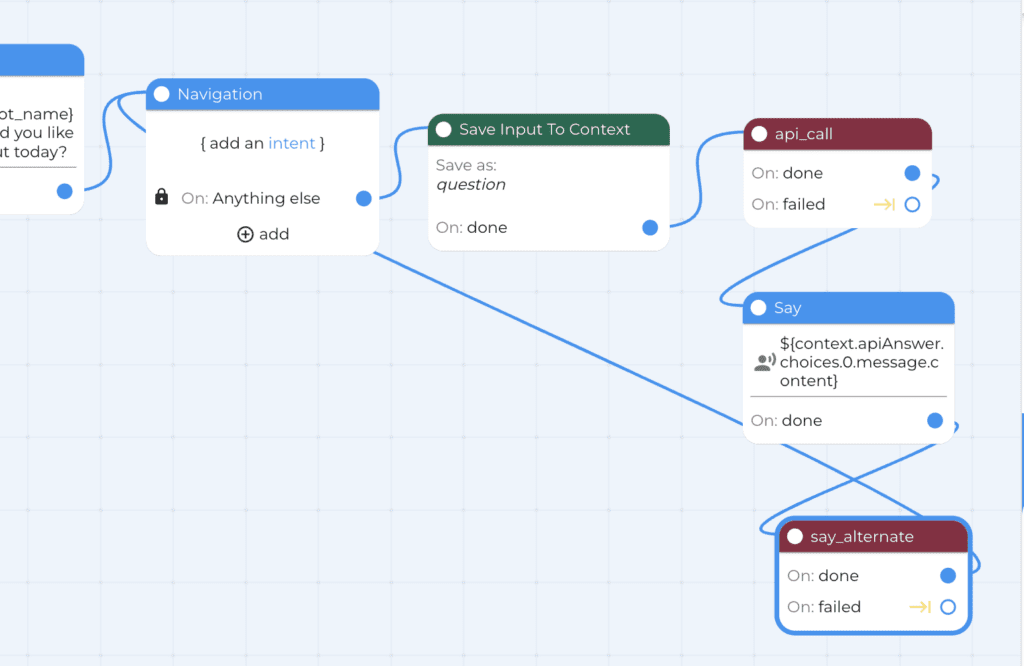
9. Now, connect the new “say” back to the first navigation – to close the circle. As a result, the next user’s question will go through the same journey again.
10. The conversation you had with ChatGPT will be saved, as usual, in your account. In order to find it, just go to the analytics tab on the left. Then, search for the “logs”. At this point, you can filter only conversations with the name of your virtual human, by writing it in the search bar.
Then, click on the relevant log to see the conversation’s transcript.
Possible additions and tweaks
Diversify the virtual human’s answers
Do you want the virtual human to continue the conversation less repetitively, after the ChatGPT-generated answer? So – meet “Say Alternate”, your go-to component for expanding the virtual humans’ variety at the same point in the conversation! Now, here’s how to add it to your conversational flow.
11. Click on the canvas, and search for the red Say Alternate component. Then, connect it to the previous “Say” and back to the main Navigation, like you’re connecting a regular “Say” (From the component onward, you have to connect only the “done” port).
12. Then, go to the inspector and click on “advanced features”.
Now, add a few alternatives. In each one, you have to write a number – preferably, start from 0 and keep going with 1, 2, 3, etc (the numbershave to follow one another!) – and a sentence you want the virtual human to tell the user.
For example, here we gave two alternatives, and when we reach this point in the conversation, the answer will be randomly selected between all the options you added. Generally, there’s no limitation to the number of possible things the virtual human can say – as long as you follow through with the number-answer, number-answer pattern.
Send the conversation to your email
Since the conversation with ChatGPT in this format is endless, the only way to stop it – and get out of the loop – is to tell the virtual human “goodbye”. However, saying “goodbye” will make the virtual human tell you “goodbye” and finish the conversation without any further steps.
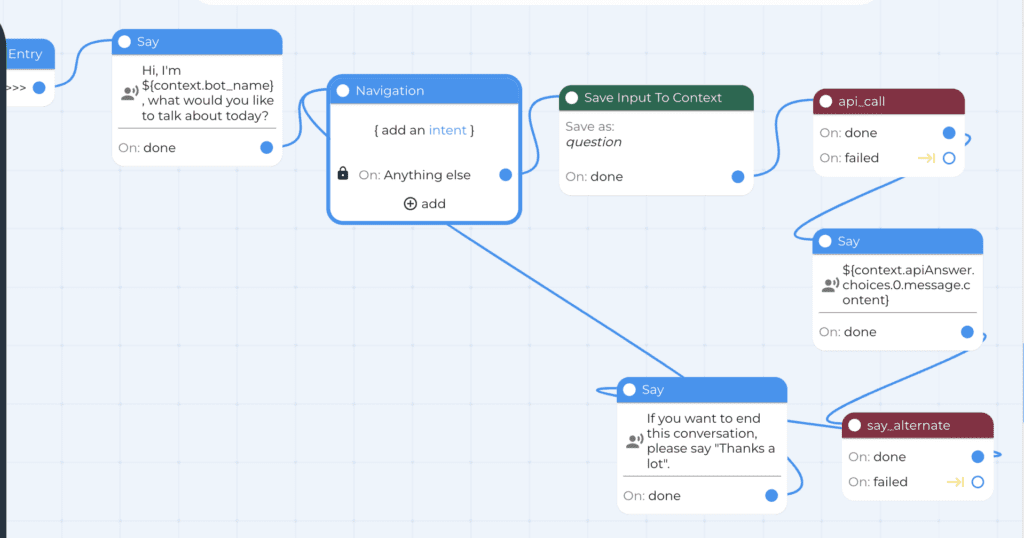
So, let’s say that you want to give the user another way to end the conversation. In this case, you can add an intent to the main navigation, that will lead to a farewell message from the virtual human. Then, it will enable you to get a transcription of the conversation to your email. Now, here’s how to do it:
13. Add another Say with the instructions to the user – for example, If you want to end this conversation, please say “Thanks a lot”. Then, connect the port from the Say Alternate to this new Say, and the port from the new Say back to the main Navigation.
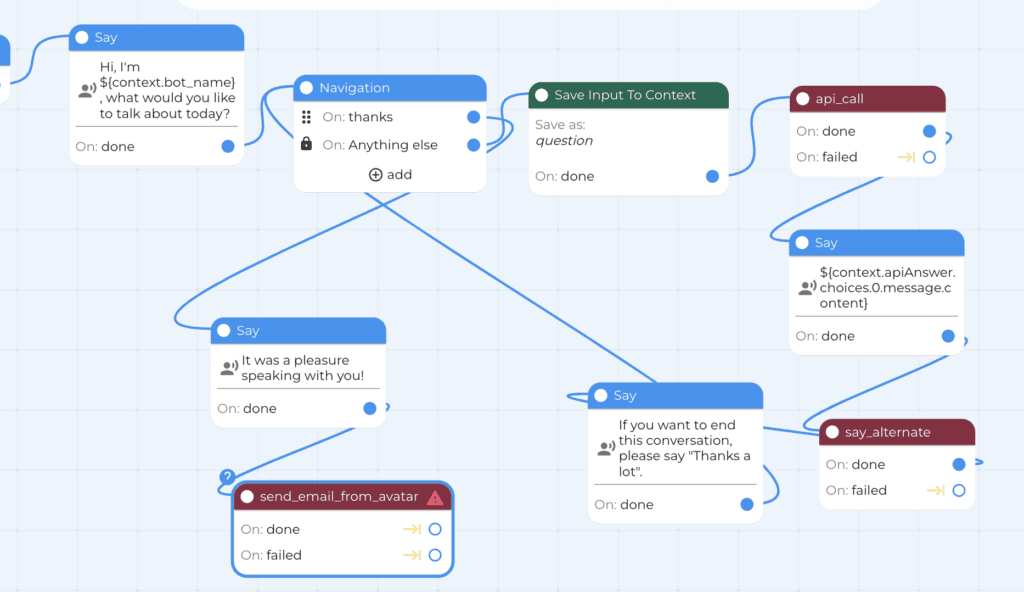
14. Then, in the Navigation, add the “Thanks” intent (by clicking “add an intent” inside the Navigation) to the Navigation. Now, when the user says “thanks” to the virtual human, it will leave the conversation with ChatGPT and head toward a conclusion.
15. Then, connect the Thanks intent from the Navigation to a new “Say”, and notify the user about the conversation’s conclusion. Obviously, it’s your call how to do it.
16. Click on the canvas and search for the “send email from avatar” red component. Connect the Say where you conclude the conversation, onward to the “send email from avatar” component.
17. Click on the “send email from avatar” component. Now, go to the inspector, and open the Advanced Features. Here you need to fill in three fields:
To
(put your email address or addresses here. If you need more than one, separate them by commas)
Subject
(The header of the conversation you’ll see in your inbox)
Body
(The body of the email you’ll receive).
* If you want to get all the conversation, you’ll need to write ${conversation_log} right here.
And…that’s it. Your virtual human is connected to ChatGPT, and now you know how to add more diverse responses and how to get an email with the conversation to your account.